Lenovo BIOS Update regarding Spectre

Update: since Ubuntu 18.04 this is not longer necessary as the software update triggers this and everything is done automatically.

In the following I describe the process to update the BIOS of a Lenovo Laptop that runs Linux for the recent problems related to Spectre.

1. Download the BIOS update “Bootable CD” from Lenovo, which is just an ISO image. For example for the Thinkpad T460 download it from here.

2. Extract the BIOS from the ISO as otherwise “dd” cannot copy the ISO properly:

geteltorito -o bios.img /home/user/Downloads/r06uj58d.iso

Check that the USB stick is really at /dev/sdb (confirm size)

sudo fdisk -l /dev/sdb

3. Copy the BIOS to some USB stick:

sudo dd if=bios.img of=/dev/sdb && sync

4. Reboot and while you see “To interrupt normal startup, press Enter” at boot press F1 to boot from USB. Follow the instructions after you connected your Laptop to the power cable, otherwise the update will not proceed.

Now when have updated the BIOS you should see a new BIOS version 1.32/1.11 (BIOS/EC ID: R06ET58W/R06HT31W) in the BIOS setup.

As I understand this fixes the Spectre vulnerability only. To improve the situation related to the so called Meltdown problem do a software update:

apt update && apt upgrade

Afterwards you should have at least kernel version 4.4.0-109:

$ uname -r
4.4.0-109-generic

Lenovo ThinkPad T460 – A Good Linux Laptop For Development

After several years with my Dell Latitude E6400 I was searching for a new, more powerful Linux machine for my coding and performance tweaking tasks. And although the Dell XPS line sounded interesting due to the “native” Linux support, it was also expensive with 16GB RAM and 3 year warranty (>2200€) and several users reported problems with CPU whining. I didn’t want to risc this and also reviews of the Lenovo T460 suggested a more silent and longer lasting experience. So I finally bought the T460 and was just hoping to get a good Linux support. Here are my experiences after a usage for a few months. Keep in mind that everyone has different requirements so maybe the title should be “a good Linux laptop for a certain subset of development tasks”. E.g. I’ve not yet tested 3D suff / hardware acceleration.

fronttop

side

My configuration is a T460, Intel i5-6200U CPU, 16GB RAM (PC3-12800 DDR3L, 2 DIMM) and 256GB SSD disc (Serial ATA3, opal 2.0). 14” IPS display, no touch screen, no finger print reader. The price was ~1300€ with 3 year guarantee, plus VAT. I’ve installed Xubuntu 16.04.1 on it.

From the Linux side everything I need is working now. And much of it worked out of the box with (X)Ubuntu 16.04.1, which I find really nice.

I had a few problems initially though:

  1. when playing a video the video didn’t scale and once I fixed this there was a delay. Finally I set the output to “X11 video output (XCB)” under preferences->Video of VLC.
  2. the WLAN worked fine but somehow the LAN disconnected frequently and reconnected automatically afterwards. Very strange. I didn’t find anything on the Internet how to fix this. But my brother mentioned that the software might have a problem with a slow 100Mbit connection and suggested to configure this. I switched to a 1Gbit port (same router) and it solved the problem! Now the LAN did not wake up after suspend (known bug) but I was able to start it via:
     sudo /bin/systemctl --no-block restart NetworkManager.service

Note that sleep via RAM works (“suspend”), ie. you can close the lid as usual. But sleep via disc (“hibernate”) does not work, but I find the boot time compelling enough that I do not need hibernation: ~2sec BIOS boot, plus ~13sec until login, plus 2sec to open a browser. BTW: hibernation didn’t work properly with the Dell too in recent Ubuntu versions. BTW: before the BIOS boot took 10 seconds, to fix this disable UEFI Network Stack (IPv4+IPv6 in the BIOS)
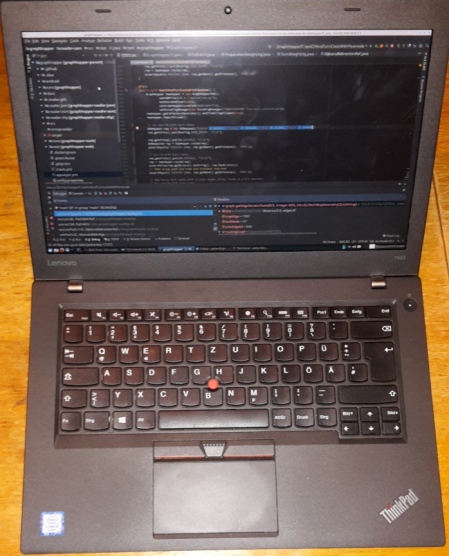
The case:

  1. The case is robust, not really beautiful, but also not ugly. An inconspicuous Thinkpad.
  2. the case feels robust but plastic, where the top cover feels of higher quality and not so plastic.
  3. It weights 1540g without the rear battery and 1870g with it. The height is 2cm without the rear battery and 3.5cm at the back with it.
  4. there is no internal DVD player, use any external
  5. some edges of the case are too sharp for my taste and feel unfinished
  6. The keyboard is ok, some love the ones of Lenovo, I find it ‘just’ okay, I really like the keys itself but I do not like the track point and you cannot disable it, without disabling also the extra mouse keys which I want.
  7. The keyboard also has the function key at the bottom left corner and not the CTRL key. I didn’t like this and switched them in the BIOS. The same for the Fn keys which I preferred over the other keys and need to switch this in the BIOS too. It still has a ESC key (!) and a big enter key which is nice to have these days.
  8. The page down/up are too close to the arrow keys for my taste but you can get use to it
  9. Sadly there is no hardware switch to turn/on of WLAN or bluethooth
  10. There is no LED indicating a power connection which is ugly when the device is turned off and has an empty battery. So you cannot be sure if it really charges.

Connectivity:

  1. 3 USB ports (USB 3.0) which are always on (nice!)
  2. HDMI
  3. LAN port
  4. the usual line for the microphone (mono) & headphone (stereo)
  5. some other stuff like a Display Port I think, look it up

Some import and partially subjective comments on the laptop:

  1. The performance is good and everything works smoothly and fast, but this is probably the case for every ordinary laptop with SSD and a normal CPU.
  2. it is super quiet. Under Idle it is indeed silent, under load only “hissing” very minimal (my old monitor is louder). And it does not get hot
  3. The IPS 14” matte display is ok and has a resolution of 1.920 x 1.080.
  4. The RAM is upgradable up to 32GB
  5. My external monitor worked out of the box with the Xubuntu inbuilt switch software (plugging in the device opens this and offers the different choices)
  6. The AC adapter is small but I like the DELL more where the cables could be bundled easier and faster than with this short and wrongly placed ‘rope’.
  7. The touch pad is good, supports also two finger gestures on Linux, but when writing you often hit it at the beginning and this sometimes garbles your text. You can learn avoid hitting it though. This is probably a software problem which should disable it when writing, it is called ‘palm detection‘ but it seems this is improvable under Linux e.g. with this post. I do not care much about it as I learned to avoid this (nearly 100%) and most of the time I use an external keyboard.
  8. The battery is really nice. On the Dell I got only 5 hours even in its early days, going down to something like 3h. Now the T460 lets you do normal work for >13 hours with the internal 23Wh and the additional big (72Wh) rear battery. We’ll have to see how this behaves with the time.
  9. The extra 72Wh rear battery is so thick that the laptop stands inclined (see picture above), which I thought is ugly at the beginning. But turns out that this is not bad, only makes minor problems if you have only a small table like in Deutsche Bahn
  10. The microphone and the chat camera is good
  11. Bluetooth works, some devices need special pulse audio setup
  12. I do not like the sound output, it is not clear but also not worse than e.g. the Dell.
  13. My printer and scanner (canon pixma mx 725) works flawlessly, even printing photos
  14. The order via the web shop took roughly 10 days, they say this is so long due to customization. I didn’t care much. Also I got a bit (sales) support and this was done via telephone and good. We’ll see how tech support looks like though. BTW: When you buy the cheapest option you can select the cheapest Windows license and upgrade the other stuff saving a bit money, also I was using a minor discount I think.

Similar products of Lenovo are the T460p (>1100€, more power, less mobile I guess) and the more expensive T460s (>1500€) and the X1 Carbon (>1800€). In all cases the 16GB RAM requirement turned out to be not that simple or expensive. I decided on the T460 because of the battery time, low/lack of noise and price.

TODOs:

  • 3D stuff, so please have a look into other reviews if you develop graphics etc
  • multiple external monitors

Conclusion

So far I like the ThinkPad T460 and can recommend it. It is powerful, has a very long lasting battery, it is silent under normal work and you can get your stuff done quickly and get solid Linux support. The Linux support is so good that I’m wondering why they do not ship it commercially to attract people like me.

The price performance ratio is good in my opinion – I can judge better in the next years when I need support and/or stuff breaks.

On the down side there is the cheap feeling of the case (plastic keyboard side&too sharp-edged) and the “track pad interferences” when you type.

See further discussion also on hacker news.

Problems with nvidia driver 173 and kernel 3.2.0-52. Two monitors and card Quadro NVS 160M

After the recent kernel upgrade my old nvidia driver failed to load and X loads with a very low resolution and without detecting my second monitor. For my graphic card the nouveau driver is not an option. But I managed to fix the problems via removing current nvidia and nvidia-173. But probably you can just skip those commands and use the jockey-gtk as explained below.

sudo apt-get purge nvidia-current
sudo apt-get remove nvidia-173
sudo apt-get install –reinstall nvidia-173-updates
# now REBOOT!

Now it boots as normal with my second monitor but the nice configuration tool called ‘nvidia-settings’ did not work and says ‘The NVIDIA X driver on is not new enough to support the nvidia-settings Display Configuration page.’

Also my firefox 23 had performance problems for canvas rendering. I solved this via opening “about:config” and set layers.acceleration.force-enabled to true. I found this in the comments of this article.

Update: I was able to fix the all the issues just by switching to ‘(additional updates) (version 319-updates)’ when starting the tool called ‘jockey-gtk’! Afterwards also the tool xfce4-display-settings showed two monitors.

EC2 = Easy Cloud 2.0? Getting started with the Amazon Cloud

If you are command line centric guy like me and you are on Ubuntu this post is for you.Getting starting with Amazon was a pain for me although once you understand the basics it is relativly easy. BTW: there are of course also other cloud systems like Rackspace or Azure.

If you want the official Ubuntu LTS Server (currently 10.04) running in the Amazon Cloud you can do:

ec2-run-instances ami-c00e3cb4 --region eu-west-1 --instance-type m1.small --key amazon-key

or go to this page and pick a different AMI. Hmmh, you are already sick of all the wording like AMI, EC2 and instances? Ok,

lets digg into the amazon world.

Let me know if I have something missing or incorrect:

  • AMI: Amazon Machine Image. This is a highly tuned linux distribution in our case and we can choose from a lot of different types – e.g. on this page.
  • EC2: Elastic Compute Cloud – which is a highly scalable hosting solution where you have root access to the server. You can choose the power and RAM of that instance (‘a server’) and start and stop instances as you like. In Germany Amazon is relative expensive compared to existing hosting solutions (not that case in the US). And since those services can also easy scale there is nearly no advantage of using Amazon or Rackspace.
  • EBS: Elastic block storage – This is where we store our data. An EBS can be attached to any instance but in my case I don’t need a separate volume I just can use the default EBS mounted at /mnt with ~150 GB or even the system partition / with ~8 GB. From wikipedia:
    EBS volumes provide persistent storage independent of the lifetime of the EC2 instance, and act much like hard drives on a real server.
    Also if you choose storage of type ‘ebs’ your instance can be stopped. If it is of type instance-store you could only clone the AMI and terminate. If you try to stop it you’ll get “The instance does not have an ‘ebs’ root device type and cannot be stopped.”
  • A running instance is always attached to one key (a named public key). Once started you cannot change it.
  • S3: Simple Storage Service. Can be used for e.g. backup purposes, has an own API (REST or SOAP). Not covered in this mini post.
  • Availability zone: The datacenter location e.g. eu-west-1 is Ireland or us-west-2 is Oregon. The advantage of having different regions/zones is that if one datacenter crashes you have a fall back in a different. But the big disadvantage of different zones is that e.g. transfering your customized AMIs to a different region is a bit complex and you’ll need to import your keys again etc.

But even now after ‘understanding’ of the wording it is not that easy to get started and e.g. the above command will not work out of the box.

To make the above command working you’ll need:

  1. An Amazon Account and a lot of money 😉 or use the micro instance which is free for one year and for a fresh account IMO
  2. The ec2 tools installed locally: sudo apt-get install ec2-api-tools
  3. The amazon credentials stored and added to your ssh-agent:
    export EC2_PRIVATE_KEY=/home/user/.ssh/certificate-privatekey.pem
    export EC2_CERT=/home/user/.ssh/certificate.pem
  4. Test the functionality via
    ec2-describe-instances –region eu-west-1
  5. Now you need to create a key pair and import the public one into your account (choose the right availability zone!)
    Aws Console -> Ec2 -> Network & Security -> Key Pairs -> Import Key Pair and choose amazon-key as name
  6. Then feed your local ssh-agent with the private key:
    ssh-add /home/user/.ssh/amazon-key
  7. Now you should be able to run the above command. To view the instance from the web UI you’ll have to refresh the site.
  8. Open port 22 for the default security group:
    Aws Console -> Ec2 -> Network & Security -> Security Groups -> Click on the default one and then on the ‘inbound’ Tab -> type ’22’ in port range -> Add Rule -> delete the other configurations -> Apply Rule Changes
  9. Now try to login
    ssh ubuntu@ec2-your-machine.amazonaws.com
    For the official amazon AMIs you’ll have to use ec2-user as login

That was easy 🙂 No?

Ok, now you’ll have to configure and install software as you like e.g.
sudo apt-get update && sudo apt-get upgrade -y

To proceed further you could

  • Attach a static IP to the instance so that external applications do not need to be changed after you moved the instance – or use that IP for your load balancer – or use the Amazon load balancer etc:
    Aws Console -> Ec2 -> Network & Security -> Elastic IPs -> Allocate New Address
  • Open some more ports like port 80
  • Or you could create an AMI of your already configured system. You can even publish this custom AMI.
  • Run ElasticSearch as search server in the cloud e.g. even via a debian package which makes it very easy.

Now if you have several instance and you want to

update software on all machines.

How would you do that? Here is one possibility

ips=`ec2-describe-instances --region eu-west-1 | grep running | cut -f17 | tr '\n' ' '`

for IP in $ips
do
 echo UPDATING $IP;
 ssh -A ubuntu@$IP "cd /somewhere; bash ./scripts/update.sh";
done

Logitech USB Headset volume is low [Ubuntu] – Fixing this with a script

There is a nasty bug in Ubuntu – even in 10.* and 11.*! But there is a simple fix via alsamixer. The problem is that the volume is always near 0 when when plugging in the device again. So this mini post is how to find out the command to increase the volume which you can execute e.g. on startup. First, you need to find out which card the device has in my case its number 1, then you need to list the controls:

$ amixer -c 1 scontrols
Simple mixer control ‘Speaker’,0
Simple mixer control ‘Mic’,0

As last step increase the volume of one or more control:
$ amixer -c 1 sset ‘Speaker’,0 90% 90%
Simple mixer control ‘Speaker’,0
Capabilities: pvolume pswitch pswitch-joined penum
Playback channels: Front Left – Front Right
Limits: Playback 0 – 44
Mono:
Front Left: Playback 40 [91%] [2.72dB] [on]
Front Right: Playback 40 [91%] [2.72dB] [on]

Now there is only one problem: how to automatically switch from 0 to my USB device 1? Here is the solution

pacmd list-sinks | grep index
pacmd set-default-sink

or the full script:
amixer -c 1 sset ‘Speaker’,0 70% 70%
amixer -c 1 sset ‘Mic’,0 70% 70%

# switch mic
sources=($(pacmd list-sources | grep index | awk ‘{ if ($1 == “*”) print “1”,$3; else print “0”,$2 }’))
[[ ${sources[0]} = 0 ]] && swap=${sources[1]} || swap=${sources[5]}
echo $swap
pacmd set-default-source $swap &> /dev/null

# switch audio
sinks=($(pacmd list-sinks | grep index | awk ‘{ if ($1 == “*”) print “1”,$3; else print “0”,$2 }’))
[[ ${sinks[0]} = 0 ]] && swap=${sinks[1]} || swap=${sinks[3]}
pacmd set-default-sink $swap &> /dev/null

Now have a look here where it is described how to call this script when the device is plugged in.

recordmydesktop – audio not in sync

Nice application!

Normally one could use the GUI (gtk-recordMyDesktop) but I had a small problem: audio and video was not in sync. I worked around via specifying my headset on the command line tool directly via

 -device plughw:0,0

Thats it!

recordmydesktop --width 800 --height 640 --v_quality 20 --s_quality 10 --delay 3 --fps 10 --overwrite --device plughw:0,0 -o timefinder-v4-screencast.ogv

If this does not work for you look here, here, here or try to disable compiz via System -> Preferences -> Appearance -> Visual Effects

and include –no-wm-check

Or use the command where I got the best results:


recordmydesktop --width 1024 --height 800 --v_bitrate 2000000 --s_quality 10 --delay 1 --fps 20
--overwrite --device plughw:0,0 --no-wm-check --buffer-size 65538 --freq 48000 --quick-subsampling
--on-the-fly-encoding -o timefinder-v4-screencast.ogv

To convert this into a youtube video do:

mencoder -idx timefinder-v4-screencast.ogv -ovc lavc -oac mp3lame -o timefinder-v4-screencast.avi

or

ffmpeg -i timefinder-v4-screencast.ogv output.mpg

To cut sth. from the video you can do:

ffmpeg -vcodec copy -i timefinder-v4-screencast.ogv -ss -00:00:10 -t 00:07:11 output.ogv

On blip.tv you don’t need this! Simply upload!

Quicktip: Upgraded to Ubuntu 9.10

I simply did (Go to the full upgrade instructions for more information.)

sudo do-release-upgrade

and clicked “ok” two times. That was all!

Within ~40-60 minutes (while I did something in parallel) it reinstalled a lot of packages, the kernel, …

Additional Info:

  • Jdk 5 is not longer supported from sun and because of this it is not available in apt-get. So you have to install it manually.
  • There is no Grip 😦 Could I use KaudioCreator as alternative?
  • Couldn’t upgrade kbluetooth4.(?) I reinstalled this … now it works
  • Upgrading the VirtualBox driver was necessary, but easy:
    sudo /etc/init.d/vboxdrv setup
  • I had to re-disable the annoying sound on the login screen, but there is no sound entry under System->Preferences ?
    But this helped: sudo apt-get remove ubuntu-sounds
  • I had to edit the color in the video player because of a blue breath: Edit->Preferences->Display->Reset to Default
  • I had to manually update the java version:
    sudo apt-get remove sun-java6-jre
    sudo apt-get install sun-java6-plugin
    sudo apt-get install sun-java6-jdk

Thats all! I like updating the ubuntu/debian way 🙂