Matchstick Graph Editor

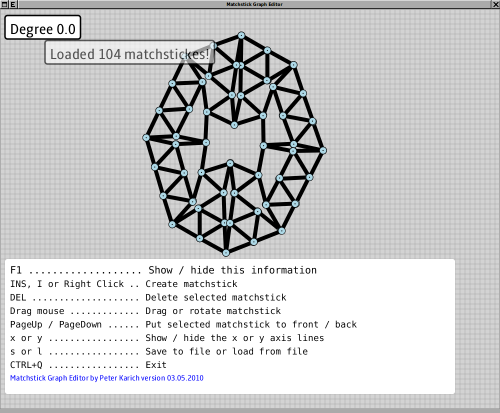
Recently I created  a specialized graph editor for matchstick graphs like the Harboth graph. It is not a fancy application but it works:

Try it out and load the data of the harboth graph into your editor!

Question: What is the minimal 1, 2 and 3-degree-matchstick graph in 2D?

Requirements:

  • In a 3 degree graph every node has exactly 3 edges
  • It must be a planar graph (edges can only intersect at the nodes)
  • Length of each edge is the same
  • Be the first and link to your matchstick.dat file(s)
  • Think about solutions for 1, 2, 3 and 4 degree matchstick graphs in 3D (easier than 2D)

Prizes: Win Experience and be listed here as a winner 😉 !

Conclusion

Getting starting and done was easy and fast within some hours. But debugging and writing tests in JavaFX (1.2 or 1.3) with NetBeans is not that good as described earlier :-/

backlink to original article from karussell

Reply via JavaFX on: Shadow Motion Effect in 5 Lines Of jQuery

I took the opportunity to see how easy or difficult it is to implement a “shadow motion effect” in JavaFX. The effect is described in a post from Lam Nguyen and he implements it in jQuery in 5 lines.

What do we need to do this in JavaFX? Is this possible at all?

Yes it is possible and it was easy, fast (~10 min) and IMHO it looks nice. BTW: It is not only an animation – you can drag it:

1. Create a new JavaFX project in NetBeans and choose ‘Drag and Drop’.

2. Then adapt the DragBehaviour to the following. The necessary changes are minimal and marked with HERE:

 // HERE: change 1 line
 public var targetGroup: Group;

 public var targetWidth: Number;
 public var targetHeight: Number;
 public var maxX = 200.0;
 public var maxY = 200.0;
 var startX = 0.0;
 var startY = 0.0;

 init {
 // HERE: +1 line
 var target = targetGroup.content[0];

 target.onMousePressed = function (e: MouseEvent): Void {
   startX = e.sceneX - target.translateX;
   startY = e.sceneY - target.translateY;
 }

 target.onMouseDragged = function (e: MouseEvent): Void {
 var tx = e.sceneX - startX;

 // HERE +7 lines
 var cloned = Duplicator.duplicate(target);
 insert cloned into targetGroup.content;
 FadeTransition {
   node: cloned fromValue: 1 toValue: 0 duration: 0.5s repeatCount: 1
   action: function () {
      delete cloned from targetGroup.content;
   } }.play();

 if (tx < 0)
    tx = 0;

 if (tx > maxX - targetWidth)
    tx = maxX - targetWidth;

 target.translateX = tx;
 var ty = e.sceneY - startY;
 if (ty < 0)
   ty = 0;

 if (ty > maxY - targetHeight)
   ty = maxY - targetHeight;

 target.translateY = ty;
 } // onMouseDragged
 } // init

3. Drag it yourself  or try it out now:

A KISS Desktop UI Implemented in JavaFX

Some minor, probably not very impressive ideas, came to my mind the last weeks to adapt the common desktop UI experience to my needs. If you like those ideas then sorry, this was not indented.

I am not familiar with Apples OS which are known to provide good UI and could have already implemented my ideas. If this happens this post is only here to show some effects and components implemented in JavaFX. Note that I am not a specialist for a good looking UI! I never read any UI guidelines, even not before this post and I am not proud of that. For specialists refer to Kirill Grouchnikov (-> pushing-pixels), Joshua Marinacci (-> blog), Jonathan Giles (-> blog), …

More Intuitve Items to Log-Off

The first change is to show all the possible log-off possibilities with more intuitive icons and not only in raw text. The user should be able to determine the right thing faster (on mouse over or click a description could pop up)
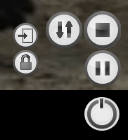
In clockwise direction or from left to right:

  1. lock screen
  2. user log out
  3. restart
  4. save to disc
  5. save to RAM
  6. and the last one: shutdown.

Some of the icons were taken from the great amarok player some were backed by my crude designer heart.

Tags instead Menu

Another idea was that the normal application menu is somewhat complicated to use. Even in Vista/Win7 or Kde 4 you need to browse through the menu if you don’t know the name of the application, although I had to admit that I really like the search functionality in Vista/Win7 (BTW that was the only thing I liked about Vista). The point is that the menu items should be clickable and then filter the application list on the right side. So the menu items behave like tags:

… select ‘Internet’ and ‘Office’ to find my email client:

The textbox can be used to further filter the applications by name:

Taskbar == Application Chooser

The next idea is a taskbar which is at the same time the application chooser which is normally triggered from ALT+TAB. So instead of the known taskbar (here kde):

and the application chooser (gnome/kde):

I want to have only one unified bar to keep things simple (see KISS). In the first try I though I will put the unified taskbar on the bottom like it is normally done with the ordinary taskbar:
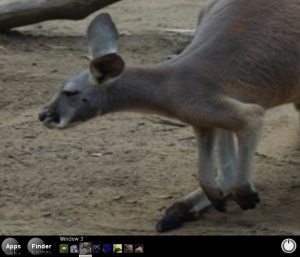
— first try of unified taskbar —

In this example I used some images to fake application content. The images were taken from a JavaFX example.

The window switching and menu-pop-up is triggered from a simple ‘mouse over’ not from a time consuming mouse click. Or sometimes I prefer keyboard then I can use ALT + LEFT/RIGHT. Now the desktop is like I wanted it, but what should be shown when I close all apps? And there is a lot of unused space between the last icon and the log-off menu which is ugly. But moving this menu to the left could cause a lot of trouble for the user. Then one solution could be to move it where it does not fit: into the finder or apps menu (like some OS vendors did).

Second Try With Desktop Ground

So we need to introduce the desktop ground as a special window available from the taskbar to make things even more simple. All the ‘starter’-icons from the Apps-menu then will go onto our dockable desktop ground. Even the finder-menu and the log-off menu will be there as docked apps which can be arranged like the user wants it. The idea of ‘docks’ is stolen from my current window manager called Window Maker. Of course those docks could be used to display weather, stocks, tweets, ….

To further improve the experience for me as a developer I will put the unified taskbar in the center of the screen. OMG, what? Yes, this bar is only displayed on e.g. ubuntu key (at the moment this is implemented with the ALT key instead). I guess, this is the point where UI experts would like to hit me, but I think this is a good solution – at least for me, because:

  1. It is simple
  2. The average distance from any point to the center is less than to the bottom of the screen, so we have faster acces to any of the current running applications.
  3. We save pixels because our taskbar is not omnipresent

So here a screenshot of this centered unified taskbar:

— second try of unified taskbar —

Always Fullscreen

We even could go further to avoid bars on the top of each application window. To close an application we could put a small ‘close’-icon (like it is the case for tabs for your browser) on each preview image of the unified taskbar. So the applications could then be always full screen like it is the case for mobile devices. Hmmh, but then we cannot see two apps at the same time!? For that we could implement resizing applications in the unified taskbar via mouse scroll and dragging via ubuntu key+mouse dragging. Now the desktop has two states:

  • Editing mode, where the taskbar is shown and application windows (except the desktop) could be closed, resized, moved and we can switch applications
  • Application mode, where normally only one application is visible in full screen

So now look at the applications’ desktop where each of the docks (two icon docks, the find-menu dock and the log-off dock) could be dragged around to suit your needs:
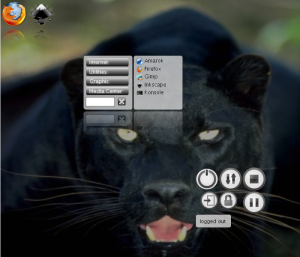
— final version —

Click here to start the webstart version.

The things which are currently not implemented in the JavaFX application:

  • Closing, resizing and dragging of application windows
  • If the user hits ENTER in the find-menu dock it should start that command and if this command does not exist it will start a desktop search
  • ALT+TAB does not work with JavaFX so I had to use ALT+LEFT and ALT+RIGHT
  • The current time could be displayed instead of an icon for the desktop

Conclusion

I would really like to see some of my UI ideas in Kde or Gnome. I think those ideas are simplifications and usage boosts and not only eye catchers in my humble opinion. Like the most UI ‘improvements’ were in the last time … keyword: compiz.

Update: The following projects comes really close to that what I had in mind:

And are there developers of JavaFX out there who read this?

Then first of all: Thanks a lot for JavaFX!

And secondly:

  • Why do I need a compiler for JavaFX?? I would really like to ‘press F5’ and see my minor layout changes or see my minor code changes. This is not a nice to have. This is a must-have, I think. This should be possible!
  • The language reference should be improved with examples otherwise it is senseless to the intented audience: developers and UI designers. And I couldn’t found the for loop!? Only the for expression … strange.
  • The toolkits (ie. NetBeans) need further, if not a lot, work . These words are a bit harsh, I know, but I am a fastidious Java developer and know how well IDEs could work.
    First of all the most pain is the debugger. I know how well this works for Java, but I only needed the content of my variable at a specific moment, but NetBeans wasn’t able to show this, although it shows the content of ‘native’ objects like Rectangle:

    So I needed to use println(“{item}”)
  • Unit tests should be as easy as for normal Java projects
  • Other anoying bugs occured: if you format e.g. the sourcecode of AppItem where some brackets (of a function) will move one column to the right on each format call. The same appears for e.g. ‘public-read var width;’ where the semicolon moves to the right, too. Problems while operating within strings and variables in the string. The code completion is case insensitive :-/ The “if else” construct is not that nicely formated if you don’t specifythe brackets. There was no javadocs for ‘native’ javaclasses. There are no boolean operations for sequence like ‘and’, ‘or’, …. which would be nice to have.

So that’s a too lengthy list, but to be honest: while working with JavaFX I had fun! Try it out!

Resources

Clone the latest and greatest status of the project here:

hg clone http://timefinder.hg.sourceforge.net:8000/hgroot/timefinder/desktopbar/

(source code is under public domain but the pics shouldn’t be reused)

or try it out now

Embed JavaFX 1.2 into Swing with JFXtras ?

If you read through the comments of Amy Fowler’s Blogentry (nice post by the way)
steveonjava posted the following news:

“We are releasing a SceneToJComponent class that makes it easy to embed JavaFX Scenes in Swing applications as a part of the JFXtras 0.5 release. The final release will come out in a few days, but for now you can try out the beta here

Hopefully this is a reliable method which will work for the next javafx version too 🙂

Thanks for making this possible!

TimeFinder released – An open source timetabler

This week I released the first public version (2009-v1) of my open source project called TimeFinder.

Although it is an alpha quality software it could be useful for schools (and universities). There are limitations! But today I will list the features only 😉

All interested users can try it out, comment the functionality and provide feedback what they don’t understand or if they want a new feature (e.g. import/export from a special dataformat). Please contact me under peathal at yahoo . de

Documentation

More detailed documentation can be found here.

Manual Timetabling

With TimeFinder you can create your timetable from scratch:

  1. Manually manage persons, events and locations
  2. Assign persons to events and a room to an event
  3. Required features for events can be defined. E.g. chemistry should only be scheduled in rooms with the feature ‘lab-suppport’.

Automatic Timetabling

Probably the most important feature of TimeFinder is its automatic timetabling engine. With that engine started (one single click after defining the data) you can optimize even difficult timetables within a few minutes or seconds. The algorithm was developed for the International Timetabling Competition 2007/08; it solved (no hard constraint conflicts) all problem sets in the given time.
The application is not limited to school or university timetable: for example it can be used for a JavaOne timetable, because it is nearly the same task: no person can attend more than one event at a time. And timefinder simply minimizes the conflicts for all attendees.

Visual Planner

Special thanks goes to Vijay Nathani for his work on the visual planner component, where he combines Java with JavaFX. The component is read-only at the moment and shows a list of all resources (e.g. persons) with its assigned events. Later on we will implement drag and drop functionality to change e.g. the start time of events visually.

Download & More Details

You can start TimeFinder as webstart application from here (21MB) or get the zip bundle (17MB). Java1.6 is required. The software stands under the Apache License, Version 2.0 – this is a very commercial friendly license – so, you can use the TimeFinder’s UI and the engine in nearly all (good!) applications.

The data storage of TimeFinder is currently file-based (xml) – a database storage will follow some day.

With MyDoggy the application supports drag and drop of the windows – so you can align and manage them as you like.

Further Thanks

This application wouldn’t be the same without the following nice open source projects:

JavaFX and Maven

There is a post which discusses all the details about how to set up JavaFX in a maven project (compiling etc).

For my timefinder project I only need a solution where I can use a JavaFX-jar within my maven project. This is a little bit faster to achieve:

  1. First, be sure you set up JavaFX correctly. For linux and JavaFX 1.1 you can try this.
  2. Now write the following in your /home/user/.m2/settings.xml:
    <settings>
      <profiles>
        <profile>
          <id>test</id>
          <activation>
            <property>
                    <name>!javafx_home</name>
            </property>
          </activation>
            <properties>
                <!-- linux -->
                    <javafx_home>/home/user/programs/netbeans-6.5/javafx2/javafx-sdk1.0</javafx_home>
                <!-- windows
                    <javafx_home>C:\Program Files\NetBeans 6.5\javafx2\javafx-sdk</javafx_home> -->
            </properties>
         </profile>
      </profiles>
      ...
    </settings>
  3. After this you can include the javafx libraries in your pom.xml:
    <project>
      ...
      <dependencies>
           ...
            <dependency>
                <groupId>com.sun.javafx.rt15</groupId>
                <artifactId>javafx-rt15</artifactId>
                <version>1.0</version>
                <scope>system</scope>
                <systemPath>${javafx_home}/lib/desktop/rt15.jar</systemPath>
            </dependency>
            <dependency>
                <groupId>com.sun.javafx.gui</groupId>
                <artifactId>javafx-gui</artifactId>
                <version>1.0</version>
                <scope>system</scope>
                <systemPath>${javafx_home}/lib/desktop/javafxgui.jar</systemPath>
            </dependency>
            <dependency>
                <groupId>com.sun.javafx.rt</groupId>
                <artifactId>javafx-rt</artifactId>
                <version>1.0</version>
                <scope>system</scope>
                <systemPath>${javafx_home}/lib/shared/javafxrt.jar</systemPath>
            </dependency>
            <dependency>
                <groupId>com.sun.javafx.eula</groupId>
                <artifactId>javafx-eula</artifactId>
                <version>1.0</version>
                <scope>system</scope>
                <systemPath>${javafx_home}/lib/desktop/eula.jar</systemPath>
            </dependency>
            <dependency>
                <groupId>com.sun.javafx.scenario</groupId>
                <artifactId>javafx-scenario</artifactId>
                <version>1.0</version>
                <scope>system</scope>
                <systemPath>${javafx_home}/lib/desktop/Scenario.jar</systemPath>
            </dependency>
            <dependency>
                <groupId>com.sun.javafx.swing</groupId>
                <artifactId>javafx-swing</artifactId>
                <version>1.0</version>
                <scope>system</scope>
                <systemPath>${javafx_home}/lib/desktop/javafx-swing.jar</systemPath>
            </dependency>
            <dependency>
                <groupId>com.sun.javafx.jmc</groupId>
                <artifactId>javafx-jmc</artifactId>
                <version>1.0</version>
                <scope>system</scope>
                <systemPath>${javafx_home}/lib/desktop/jmc.jar</systemPath>
            </dependency>
            <dependency>
                <groupId>com.sun.javafx.websvc</groupId>
                <artifactId>javafx-websvc</artifactId>
                <version>1.0</version>
                <scope>system</scope>
                <systemPath>${javafx_home}/lib/desktop/websvc.jar</systemPath>
            </dependency>
            <dependency>
                <groupId>com.sun.javafx.scriptapi</groupId>
                <artifactId>javafx-scriptapi</artifactId>
                <version>1.0</version>
                <scope>system</scope>
                <systemPath>${javafx_home}/lib/desktop/script-api.jar</systemPath>
            </dependency>
            <!-- The javafx dependencies are taken from the profiles/desktop.properties file-->
        </dependencies>
    </project>
  4. That’s it! Now you should be able to use javafx or javafx-components in you fancy application. In the most cases you might be interested in one of my previous posts, which discusses how to embed a javafx-component into an existing Swing-application.

JavaFX Links (4)

Now it is time again for a new link collection (the last one?) about JavaFX stuff:

Calling JavaFX from Java

For my open source timetabler I had to searched for a solution to embed JavaFX components into Swing. But I didn’t see a version which is officially supported.

But as always there are workarounds like the one from Josh Marinacci. So far I can’t get it working it gives me:

java.lang.NoSuchMethodException: MyScene.javafx$run$(com.sun.javafx.runtime.sequence.Sequence)

The simple workaround is now the following (Java Side)

JXScene scene = new JXScene();
scene.setScene(new de.timefinder.planner.widgets.SwingHook());
// ... or create the class indirectly
// Class clazz = Class.forName("de.timefinder.planner.widgets.SwingHook");
// scene.setScene(clazz.newInstance());

// now copy parts of the code from Josh's article
class JXScene extends JComponent {
    public void setScene(Object scene) {
        String helperName = "com.sun.javafx.scene.JSGPanelSceneImpl";
        FXClassType type = FXContext.getInstance().findClass(helperName);
        FXObjectValue panelSceneImpl = type.allocate();
        panelSceneImpl.initVar("scene", FXLocal.getContext().mirrorOf(scene));
        panelSceneImpl.initialize();

        FXValue jsgPanelV = type.getVariable("jsgPanel").getValue(panelSceneImpl);
        JComponent jsgPanel = (JComponent) ((FXLocal.ObjectValue) jsgPanelV).asObject();
        add(jsgPanel, BorderLayout.CENTER);
    }

    public JXScene() {
        setLayout(new BorderLayout());
    }
}

And use the same JavaFX side snippet:

public class SwingHook extends Scene {
    init {
        content = MainWindowContents{}.getContents()
    }
}

Important Update: Pedro commented on Amy Fowler’s Blog that you have to have a run method in the Scene class:

public function run(args: String[]) {
 AnimationScene = AnimationScene { }  // just an example
 }

Then my fix to Josh’s workaroung shouldn’t be necessary (I didn’t tried it so far, because this fix would not work for javafx1.2)