Plugable Spring RC? (OSGi with Spring Rich Client)

My last post was about pure Swing, which could be easily OSGified. OSGi technologie can be e.g. used to hotdeploy or undeploy jar files to your application server (at the moment only Spring’s server is suggested) or simply to update your Swing application at runtime or write plugins for them. I don’t know for sure, but it seems to me that Eclipse is the most prominent user of OSGi (equinox is one implementation of the specification…) as desktop application, although NetBeans can now use OSGi bundles.

(BTW: do you know a funny myth where the small “i” from OSGi could come from? No? Read the comments here!)

In the last post I show you several swing applications, which were successfully OSGified, today I would like to list Swing- or Eclipse-based applications which use Spring Dynamic Modules:

Then today, in contrast to my last post, I would like to show you an identical solution for the Spring Rich Client project.

Why should I use another framework on the top of OSGi? This is simple: Spring DM provides several nice features, like no dependency on the OSGi implementation (felix, equinox, knopflerfish) and even no one on OSGi at all. Everything (and think) is a bean, like always! But why Spring DM? Why not Declarative Services from OSGi itself or Apache iPOJO? This is simple: I don’t know the others and Spring Rich Client cries for the Spring solution 😉

But to make this short story very short: after struggling the last two days to get Spring Dynamic Modules integrated with Spring Rich Client I gave it up and tried the pure OSGi solution – and – it works. It might be an ugly solution for all those of you who like dependency injection, but this can be optimized later. Today this might be the first plugin for Spring Rich Client – ever:

osgified-springrc

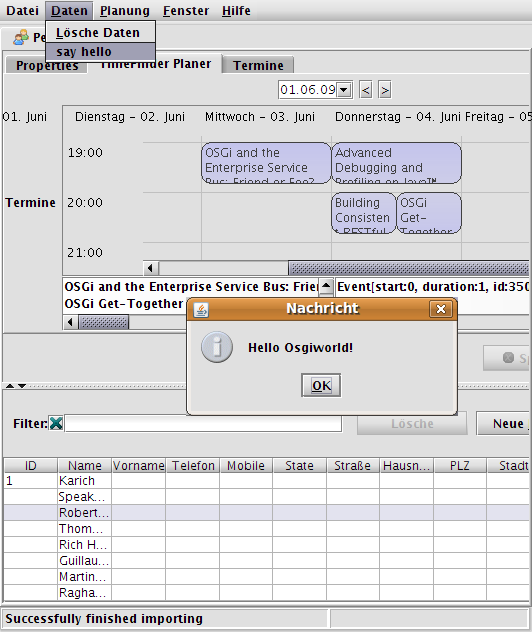
The button “say hello” with its JOptionPane message was installed through the dynamically loaded plugin. The source code is nearly identical to the one in my previous post. Just add the Spring RC startup before you grab the menu from the application to create a MenuTracker, which calls the MenuService(=plugin):

@Override
public void start(BundleContext context) throws Exception {
 startup.start();
 menuTracker = new MenuTracker(context, Application.instance().getActiveWindow().getControl().getJMenuBar().getMenu(1));
 menuTracker.open();
}

The source is available from my TimeFinder project via:

svn checkout -r 595 https://timefinder.svn.sourceforge.net/svnroot/timefinder/trunk timefinder

Be sure to start the application from de.timefinder.core.osgi.Activator (main method!).

I hope this post inspired someone to be the first one with Spring DM + Spring RC marriage … or sb. suggests working examples how Spring DM could be started from command line or from NetBeans.

Integrate MyDoggy in Spring Rich Client 1.0.0

I did some basic introduction to SpringRC here and here.

Now it is time to leave the basics and hack into the details of the ‘gui architecture’ in Spring RC 1.0.0. So this more technical article is not really important for the ‘normal developer’ – only those who want to integrate its own docking framework.

To see a fully working example in action go to the resource section and load it down 😉

I started the MyDoggy integration to avoid licensing issues with vldocking and jide, which are currently integrated into Spring RC. Another option would be flexdock, but this project is inactive since a long time. It would be great to see the integration of some more docking frameworks. Swing-Docking will be included in SpringRC 1.0.1, see this jira issue for more information.

To use the MyDoggy integration you will need at least Java 5 and the upcoming MyDoggy 1.5.0 (included in the example). This version offers much more features, which won’t be used from my integration.

I simply looked into the source code of vldocking to get started with MyDoggy. This code is located in the spring-rich-client-docking folder. The necessary classes were:

  1. MyDoggyApplicationPage extends AbstractApplicationPage
    From this class we normally have one instance (the JFrame) and we can add views to this page (south, north, …). For MyDoggy we will need only one view, but several Contents (the MyDoggy-term for PageComponent). Those components will have one header, where we can drag & dock them.
  2. MyDoggyApplicationPageFactory implements ApplicationPageFactory
    This class creates one instance of our MyDoggyApplicationPage and loads the layout from the xml file if possible.
  3. MyDoggyPageDescriptor extends MultiViewPageDescriptor
    With this class we can specify properties to create the page. In MyDoggy we will need to specify the xml file here only (as a Resource)

(Please keep in mind: in my implementation the SpringRC’s-specific terms ‘View’ and ‘PageComponent’ have the same meaning and are equivalent to the MyDoggy specifc term ‘Content’)

For all docking frameworks the ApplicationPage is the most important class. For a standalone usage you will create a JFrame and set the special layout manager. For SpringRC you can do this via implementing the following method of the ApplicationPage implementation and return the root component

protected JComponent createControl() {
 rootComponent = new JPanel();
 rootComponent.setLayout(new ExtendedTableLayout(new double[][]{{0, -1, 0}, {0, -1, 0}}));
 rootComponent.add(toolWindowManager, "1,1,");
 return rootComponent;
}

Put the rest of all the initialization (toolWindowManger etc.) in the constructor of ApplicationPage.

If you remove a the root component (normally on an application shudown) you want to save the layout. So, you need to implement the close method

public boolean close() {
  try { saveLayout(); } catch (IOException ex) { }
  return super.close(); }

The entry point to create a PageComponent is

protected void doAddPageComponent(PageComponent pageComponent)

For MyDoggy I added the created Content to the contentManager object.

I don’t know if the following code in doAddPageComponent is necessary, but the comment made it important:

   // trigger the createControl method of the PageComponent, so if a
   // PageComponentListener is added
   // in the createControl method, the componentOpened event is received.
   pageComponent.getControl();

Now we should revert the doAddPageComponent stuff in the following method

protected void doRemovePageComponent(PageComponent pageComponent) {
   contentManager.removeContent(e.getKey()); ... }

As one of the last steps we should inform SpringRC of MyDoggy-specific events like removing (closing a Content)

private class MyDoggyContentListener implements ContentManagerUIListener {
        public boolean contentUIRemoving(ContentManagerUIEvent cmEvent) {
            Content content = cmEvent.getContentUI().getContent();
            PageComponent pc = getPageComponent(content.getId());
            close(pc);
            return false;
        }
        public void contentUIDetached(ContentManagerUIEvent cmEvent) {}    }

Do not forget to register this listener in your docking framework

contentManagerUI.addContentManagerUIListener(new MyDoggyContentListener());

Resources

  • Another older, but very good tutorial is located here.
  • Here you can download the project (12.07.2008) with all the necessary jars. It is a NetBeans 6.1 project, so you can simply copy all spring-rc jars into the lib folder and open the project with NetBeans. Then resolve references via right click or change the references directly; in nbproject/project.properties.

Spring DI via Java configuration. No XML!

In picocontainer you have only one option: configure your beans with pure Java code. Thats what I want. Because it is type safe and all major IDE will easily refactor this code later if necessary.

Then, with nanocontainer, it is even possible to write the configuration code in scripting languages.

In Spring you normally hook up your dependencies in an xml file. This is okay as long as you learn this ‘xml’. So, I looked around if there are alternatives to xml.

Here are the results:

Spring Rich Client – Part 2

Let us do some more basics with the “Spring Rich Client” 1.0.0 (SpringRC). Although it is time to give an overview of the entire architecture I won’t do this here, because I am a newbie with Spring and SpringRC. So we will just look into the steps how we get things running.

Update: See an older post for a good intro or this link collection for more information.

Startup

First of all we want to include a license prompt on the very first startup. If it is in pure text format surround the license with <pre>licenseText</pre>, save it to the classpath as /path/license.txt and do the following:

  • Add the source code into LifecycleAdvisor
        private final Log logger = LogFactory.getLog(getClass());
        private static final String SHOW_WIZARD_KEY = "setupWizard.show";
        private Settings settings;
        @Override
        public void onPreStartup() {
            boolean showDialog = true;
            if (settings.contains(SHOW_WIZARD_KEY)) {
                showDialog = settings.getBoolean(SHOW_WIZARD_KEY);
            }
            if (showDialog && getApplication().getApplicationContext().containsBean("setupWizard")) {
                SetupWizard setupWizard = (SetupWizard) getApplication().getApplicationContext().getBean(
                        "setupWizard", SetupWizard.class);
                setupWizard.execute();
                settings.setBoolean(SHOW_WIZARD_KEY, false);
                try {
                    settings.save();
                } catch (IOException ex) {
                    logger.error("Can't save state.", ex);
                }    }    }
        public void setSettings(Settings set) {
            settings = set;
        }
  • Add the following text into the application-context.xml
    <bean id="setupWizard" class="org.springframework.richclient.application.setup.SetupWizard">
        <property name="licenseTextLocation" value="/path/license.txt" />
    </bean>
    <bean id="xmlInternalSettings"
          class="org.springframework.richclient.settings.xml.XmlSettingsFactory"
          factory-bean="settingsManager"
          factory-method="getInternalSettings">
    </bean>
    <bean id="settingsManager" class="org.springframework.richclient.settings.SettingsManager">
            <property name="settingsFactory">
                <bean class="org.springframework.richclient.settings.xml.XmlSettingsFactory"/>
            </property>
    </bean>

    And insert <property name=”settings” ref=”xmlInternalSettings” /> into the lifecycleAdvisor bean’s property list.

  • As last step you have to fill in the message text for this wizard into the message.properties file:
    setup.intro.welcomeTo = Welcome to
    setup.intro.title = TimeFinder!
    setup.intro.description = TimeFinder in one of its future releases will help you with automatic and manual timetabling.
    setup.cancel.title=Cancel Setup
    setup.cancel.message = Do you really want to exit the application?
    acceptLicenseCommand.label=I &accept the terms of this license agreement
    doNotAcceptLicenseCommand.label=I do ¬ accept the terms of this license agreement
    setup.license.title=License agreement
    setup.license.description=Please read the following license agreement carefully

The most of the xml code above is necessary to inject a new instance of Settings which will be created from the SettingsManager.

… Break …

Does anybody of you know, how I can do this in Java, not in ugly xml? Well, I could create the factory directly in the LifecycleAdvisor, but how can I do this dependency injection in Java (with Spring)?

… Okay, let us go further …

This settings object is then accessible within the LifecycleAdvisor because of the setSettings method and is necessary to save, if this wizard should be prompted on the next startup again. The xml-settings will be written to currentPath/settings/internal.settings.xml.
The used SetupWizard extends from AbstractWizard. This abstract class could be used for any other wizards: just add one or more AbstractWizardPages to the wizard and see this documentation. Here is the result:


Another cool feature is to show a progressbar on the splashscreen. This was very easy: add (or replace the existing) bean to the startup-context.xml file:

<bean id="splashScreen" class="org.springframework.richclient.application.splash.ProgressSplashScreen" scope="prototype">
        <property name="imageResourcePath" value="/de/peterk/springr/ui/images/splash-screen.png" />
        <property name="showProgressLabel" value="true" />
</bean>

Now I did an ugly hack. I want to change the colors of the progressbar. But only on the progressbar on startup, so we have to revert the following code:

Color myYellow = new Color(255, 225, 100);
Color myGreen = new Color(120, 208, 60);
UIManager.put("ProgressBar.selectionForeground", myYellow);
UIManager.put("ProgressBar.selectionBackground", myGreen);
UIManager.put("ProgressBar.foreground", myGreen);
UIManager.put("ProgressBar.background", myYellow);
UIManager.put("ProgressBar.border", new LineBorderUIResource(myYellow));

To revert these changes, please look into the method LifecycleAdvisor.onPreWindowOpen (see the resources section, I will not post it here – it is too stupid ;-))

Here is the result:
Views …

Hopefully I can create a next blog entry about the docking framework MyDoggy and the integration into SpringRC. Now it works like a charm – try it out! (see resources).

Today I will show what you can apply to all ‘component managers’ that are integrated in SpringRC.

First: there is one application per virtual machine. But there could be one or more ApplicationPages (JFrames) with several views (center, north, south, …). In our case (MyDoggy) there is only one ApplicationPage.

Normally you want to have more than one component per start-up page. To change this add the following xml to the application-context.xml:

<bean id="aLotOfViews" class="org.springframework.richclient.application.support.MultiViewPageDescriptor">
   <property name="viewDescriptors">
     <list>
        <value>view2</value>
        <value>initialView</value>
     </list>
   </property>
</bean>

And change the startingPageId in the lifecycleAdvisor bean to aLotOfViews. With the upcoming MyDoggy 1.5.0 enabled we can get this nice layout, which will be automatically saved(!):

Of course it is possible to use other layout manager like swing dockings:

… and more!

If you want to use custom components: just add them! I created a custom component with the open source Matisse GUI builder integrated in NetBeans. Here is the code how you can put this component into SpringRC:

public class CalculatorView extends AbstractView {
    protected JComponent createControl() {
        JPanel panel = getComponentFactory().createPanel(new BorderLayout());
        panel.add(new CalculatorPanel()/*created with Matisse*/, BorderLayout.CENTER);
        return panel;
    }}

To add this view to the startingPage do (aLofOfViews already references to this bean, so no changes are necessary there):

<bean id="view2" class="de.timefinder.core.ui.mydoggy.MyDoggyViewDescriptor">
        <property name="viewClass" value="de.timefinder.core.ui.CalculatorView" />
</bean>

One thing you have to know is: How to translate keys within this ‘external’ CalculatorView?

In Matisse do:

  1. Click the button, where you want to translate the text
  2. Then – in the property panel on the right side – click on the […] button
  3. Select “Resource Bundle” instead of “Plain Text”
  4. Use the messages.properties file for the bundle name
  5. Insert the appropriate key (defined in messages.properties)
  6. Use the following line to get the value (click on the “Format…” button) Application.instance().getApplicationContext().getMessage(“{key}”, null, null)

For all of the following components it is easier: do 1, 2, 3 and insert the key! This could be the new slogan for Matisse 😉

Now some more I18N. For example you want to display: “Result of $number!” you should use the following line in message.properties:

calculatorPanel.title=Result of {0} !

and get the formatted string via

Application.instance().getApplicationContext().getMessage("calculatorPanel.title", new Object[]{result}, null);

Another small point could be the ugly output of the standard java 1.4 Logger. We will now change the two-lined logging output into a one-lined. Actually this is a one-liner if you look for yourself into the resource section for the TFFormatter class:

java.util.logging.Logger.getLogger("de.timefinder").getParent().getHandlers()[0].setFormatter(new TFFormatter());

Tasks

In Swing you can use the Swing ProgressMonitor, but in SpringRC you should use the integrated ProgressMonitor to indicate the current progress of a task in the bottom right corner of the page:

With the factorial view of my example you can calculate, yes, factorials. I tried “50 000” and the calculation took nearly the same time as adding the number to the JTextArea …

So, use the ProgressMonitor in combination with the SwingWorker (I grabbed it from jdesktop, but you can use SpringRC’s Swingworker as well. Get the concurrent package from here or through maven. )

Now you can use the following code to execute a long running task:

ApplicationWindow aw = Application.instance().getActiveWindow();
final ProgressMonitor pm = aw.getStatusBar().getProgressMonitor();
String str = Application.instance().getApplicationContext().getMessage("calculatorPanel.startTask", null, null);
pm.taskStarted(str, -1);
SwingWorker sw = new SwingWorker() {
        BigInteger resultLong = BigInteger.ONE;
        //protected Object construct() in SpringRC's SwingWorker!
        protected Object doInBackground() {
            // now my long task and the progress indication
            for (int i = 2; i <= fac && !pm.isCanceled(); i++) {
                pm.worked(100 * i / fac);
                resultLong = resultLong.multiply(BigInteger.valueOf(i));
            }
            return resultLong;
        }
        //protected void finished()
        @Override
        protected void done() {
            // all of the following code will be called on the Event Dispatching Thread
            if (pm.isCanceled()) {
                output.setText("Canceled");
            } else {
                output.setText(resultLong.toString());
            }
            pm.done();
        }
    };
    //sw.start();
    //sw.clear(); // reuse would be possible with SpringRC's SwingWorker!
    sw.execute();

Conclusion

SpringRC offers us – as client-side-programmers – a bunch of powerful utilities to build our application fast and scaleable. Some parts are well documented; some parts not. But I think with relaunching the project in October ’08 (hopefully!) as Spring Desktop it will get a lot of support from even more users and maybe from the company SpringSource itself. Hopefully then the documentation will be better…

The most important point for me is that SpringRC is ‘only’ a sweat jar collection and not a layer between me and Swing.

Another point is that SpringRC uses dependency injection and NetBeans RCP uses the service locator approach e.g.
SomeInterfaceImpl impl = Lookup.lookup(SomeInterface.class).
instead of the setter injection in the very first example for SpringRC.
For others this could be one more argument against NetBeans RCP (not for me …)

Resources

  • Another older, but very good tutorial is located here.
  • Maybe it is interesting to know: in the updated version of the book Spring – A Developer’s Notebook the last chapter 9 is about the Spring Rich Client Project (author was Keith Donald).
  • Here you can find part 1.
  • Here you can download the project without the jars included in the SpringRC’s download (It is a NetBeans 6.1 project, so you can simply copy all jars of SpringRC into the lib folder and open the project with NetBeans. Then resolve references via right click or change the references directly; in nbproject/project.properties).
  • Update: Other resources can be found here.
Dependency Injection – 3 Questions!

Normally the reason why I write blogs is to inform other people about interesting things I found or I am thinking about. Today I will ask some questions and wait for your answer 😉

One of my latest posts was about the spring rich client. Because of this project and picocontainer I read a lot about design patterns. The most obvious design pattern in spring is called dependency injection. This design pattern helps the software architect to loosly couple components. It could work like follows (just for the JSE-developers under us):

class ClassA {
MyInterface objectA;
public void setMyInterface(MyInterface objA) {objectA = objA;}
}

where we could have defined the interface like this:

interface MyInterface{ String toString(); }

Now, ClassA defines a dependency on an instance of MyInterface and the framework (for Java e.g. picocontainer, spring, juice or others) will inject an instance of an implementation of MyInterface into ClassA. It is up to the configuration if objA is a newly created instance or if it is a ‘singleton’. (MyInterface could be a class as well.)

For example if you call

ClassA classA = framework.getBean(ClassA.class); //code is similar to picocontainer; not to spring!

You will get back an instance of class ClassA, where objectA is not null! The dependency was defined by the method (setMyInterface) – this is called setter injection. Other kinds of injections are:

  • annotation-based injection:
    class ClassA { @Inject Object objectA; }
  • constructor injection:
    class ClassA { Object objectA;
    public ClassA(ObjectA objA) {objectA = objA;}
    }

Where picocontainer campaigns for constructor and spring for setter injection (but both projects offer at least the mentioned kinds of injection).

It is correct that you can create your own small framework or even set up the objecs by hand to achieve the same: dependency injection. But I guess you are lazy and will choose one of the open source frameworks.

Now, all is explained to understand my 3 questions. Hopefully someone out there will have an answer!

1. How should I design a library?

Let me explain. You want to sell a nice designed, but complex library. The library offers a lot of functionality and you want to split it into loosly coupled components. That means you have to use dependency injection (DI), but you don’t know if the customer has or wants such a DI-framework.

So, if you use e.g. the annotation-based injection it would be nearly impossible for the customer to use your library; with setter or constructor injection it is quite difficult to set up the objects for using your library.

I don’t know what to do: Should I really use dependency injection here? Or should I use a (dynamic) service locator instead; to decouple my components within the library?

Martin Fowler says:

“It (dependency injection) tends to be hard to understand and leads to problems when you are trying to debug. […] This isn’t to say it’s a bad thing, just that I think it needs to justify itself over the more straightforward alternative (service locator).”

A common reason people give for preferring dependency injection is that it makes testing easier. The point here is that to do testing, you need to easily replace real service implementations with stubs or mocks. However there is really no difference here between dependency injection and service locator: both are very amenable to stubbing. I suspect this observation comes from projects where people don’t make the effort to ensure that their service locator can be easily substituted.

“So the primary issue is for people who are writing code that expects to be used in applications outside of the control of the writer. In these cases even a minimal assumption about a Service Locator is a problem.”

So: What would you do? Would you use a service locator or dependency injection inside the library?

And this leads me to the next important question:

2. Why is a singleton an antipattern?

I stumbled over this question while I used picocontainer. They say you have to avoid singletons, because it is difficult to test and to replace. My question is: why? Imagine the following singleton:

class LogFactory{
public static Logger getLogger(Class clazz) { … }
}

Now it is really easy to replace the implementation of the Logger interface e.g. if one defines a setImpl method:

LogFactory.setImpl(LoggerForTesting.class);

So what’s soo wrong with a singleton?

3. How can I avoid making all classes public?

I don’t know if it is the case for autowiring in spring. But in picocontainer you have to set-up the configuration for the wiring of the classes by yourself e.g. in a separate class (with Java; no xml! compiler checks references! yeah!) or in a separate file with a scripting language (or xml) and nanocontainer. That means you could specify the implementations of the interface by:

framework.setImpl(MyInterface.class, FirstImpl.class);

But wouldn’t it mean that I have to add the modifier public to the class FirstImpl? (To let picocontainer call the default constructor.) This can’t be good design to allow the user of my library to see the implementations of MyInterface.

Whats wrong with my use case and my conclusion?

Spring Rich Client – Part 1

Today I will start a series about the great Swing framework called Spring Rich Client (SRC). The 1.0.0 version was released in March 2008 and it is not inactive as I thought before.

You can get more information about SRC from:

Why I listed the forum as the first point? Because for a beginner like me it was the best source of information (after the samples).

So, let us set up a hello world example.

  • Download the Spring Rich Client 1.0.0 from here (19 MB, Apache License 2.0).
  • Download my Hello World skeleton (a NetBeans 6.1 project, 60 KB) or use the spring-richclient-archetype from the download bundle of SRC, where you have to install maven before you can compile and run it.

If you use my Hello World skeleton you should open it in NetBeans, right click on the project node and resolve reference problems. Then go to the place where you have unzipped the SRC and add the first jar file. The other jar files should be added automagically for you.

The project with dependencies would be about 2.7 MB, it is not a small overhead, but okay, I think. As an example for the reader one can compare it to the minimal size of the NetBeans or Eclipse RCP.

Now it is time to start the project with F6 or Run->’Run Main Project’. You should see the frog-splashscreen and the final view:

Now let me explain several things that one could customize in SRC. Please see the Resources section for the result of customization.

As the first point I wanted to know how easy it is to introduce docking capabilities (vl docking). It was really easy!

  • add spring-richclient-docking.jar and vldocking.jar
  • and change 2 things in the richclient-application-context.xml file:
  • change class of initialView to org.springframework.richclient.application.docking.vldocking.VLDockingViewDescriptor
  • add a applicationPageFactory to the richclient-application-context.xml

Then you can add a new window to see the results of dragging:

  • Create the class View2
  • add the following to the richclient-application-context.xml:
  • <bean id=”view2″
    class=”org.springframework.richclient.application.docking.vldocking.VLDockingViewDescriptor”>
    <property name=”viewClass” value=”de.peterk.springr.View2″ />
    <property name=”autoHideEnabled” value=”true” />
    <property name=”closeEnabled” value=”true”/>
    </bean>
  • and you are done! Just start the application go to Windows->Show View->View2

Now,

how easy is it to use your own layout? Configuring the look and feel:

  • Remove the lookAndFeelConfigurer and add instead:
    <bean id=”lookAndFeelConfigurer” class=”de.peterk.springr.ui.KunststoffConfigurer”></bean>
  • remove looks.jar: 350 kb
  • add kunststoff: 17 kb
  • add the KunststoffConfigurer class to the source package

Okay, then changing the splash screen is trivial: just overwrite the splash-screen.png or change the path in the richclient-startup-context.xml file.

Now we should adjust the size of the view, this can be done with 2 lines in the method SimpleLifecycleAdvisor.onPreWindowOpen:

Rectangle rect = GraphicsEnvironment.getLocalGraphicsEnvironment().getMaximumWindowBounds();
configurer.setInitialSize(new Dimension(rect.width, rect.height));

And to translate the messages simply copy all property files to e.g. file_de.properties and translate them! In our case it means “cp message.properties message_de.properties”. If you want to add a translateable tool tip of the initalView-label just use:

  • lblMessage.setToolTipText(getMessage(“initialView.toolTip”));
  • in InitialView.createControl and add the property initialView.toolTip to the property file.

To set a keyboard shortcuts e.g. to leave the application. You need to add one line to the message.properties file

  • exitCommand.label=Exit@ctrl Q

Another interesting action (in SRC they will be called commands) could be restart. So how can we add the action into the menu? You have to add

  • restartCommand.label=Restart@ctrl R
  • in the message.properties file and use
  • Application.instance().start(); Application.instance().getActiveWindow().close();
  • within your RestartCommand class. Then add
  • <bean class=”de.peterk.springr.RestartCommand” />
  • into the commands-context.xml (e.g. after <value>propertiesCommand</value> in fileMenu)

The final result is:

Resources

Here you can download the extended “hello more” sample (a NetBeans 6.1 project about 90 KB, without dep). The full project was 2.9 MB.

Conclusion

One can say that Spring Rich Client is a powerful jar collection :-). But I would say SRC is a great way for your next swing application!

It is very intuitive to use: the whole sample (including to write this blog) took me only about 6 hours. I think you could be really productive with it! In the case I published the documents with mistakes: please leave your comment here!

Eclipse and Spring in Small Doses

Introduction

Today I will write about a tutorial for spring and eclipse beginners. The original ‘Spring in Small Doses’ was posted here from Tiago Brito Spindola. Because I never really used eclipse I will try to describe additional steps, which will be necessary for eclipse newbies and I hope someone could benefit from it.I am a NetBeans user from 3.4 on, so I hope exploring eclipse features will be interesting and fun. For a nice comparison look here.

I chose the spring-tutorial, because the title suggested it could not get really difficult. As you will notice later the sources are well organized and you will learn concepts like ‘dependency injection’, too (if not already done).

Lets Start With The First Example

Download the four necessary things described in the tutorial:

Some questions related to eclipse arises in the following order, while I go through this example.

At the very first you have to define some user libraries.

How can you define user libraries with eclipse?

With Window->Preferences; Java->Build Path->User Libraries. (You could search within this window – nice!) you can do this.

Hint: I couldn’t find derby in the jdk path, but you can get the latest version here (I used 10.3.2.1). By the way: what is a workspace? Why you need it? If you have multiple projects opened? Or why?

Now it is time to compile the example files. To do so, you have to import the existing sources into eclipse.

How can you import existing projects?

  1. Window->Show View->Other; Search for ‘Project’->Select ‘Project Explorer’
  2. Right click into the window and click ‘import’
  3. Expand the ‘General’ node and select ‘Existing Projects into Workspace. Press ‘next’.
  4. Browse to the location of the root of example one and press ‘Finish’.

Now you are done with it and can close the project via right clicking on the project node and click ‘Close Project’. Go further with

The Second example

Import ‘Report Engine – Part 2’ like described above and right-click the root node of this project. Now go to ‘Run As …’->Java Application and choose ReportViewerStarter as main class. Or type Shift+Alt+x and then j – you will see a popup menu with all possible key combinations before you will type the ‘j’ – this is a nice eclipse feature to learn key bindings! Now you can type in countries and you will see some content in the table.

If you select SpringReportViewerStarter you will see the same frame – but it is different! Because now the sources doesn’t directly rely on the spring libraries!

Go on with

The Third Example

In this part the author of the original tutorials wants to use a database table instead of the file for the country data. You would say: ‘ups I will recreate the program from the scratch or what !? No, this is not necessary, because the author created the program with this ‘feature’ in mind and uses the spring libraries. But maybe he wouldn’t have this in mind – we always benefit from spring, because we decouple implementations from interface and the implementation even could change while running the program. So with spring libraries you are very flexible for later changes.

You will only need some changes to the configuration files and add a new jdbc factory class.

For this example you have to fill the database (derby) with some values. Derby is a really nice, small, powerful and secure database. I used it for my own projects.

How to set up derby?

Find the ‘derby.xml’ file in the ant folder. Then proceed as follows:

  1. Start the server with: Right click derby.xml and ‘Run As’->’Ant Build…’; Deselect ‘usage’ and select ‘start’. Then click ‘Run’. It is possible that you have to set the property derby.home to e.g. /home/peter/programs/derby. You can do this in this (ant-build) dialog: select the tab ‘Properties’ and deselect ‘Use global properties ..’. Then click ‘Add Property…’ and type in your necessary value for the folder.
  2. Fill the database via right-clicking on derby.xml and then click ‘Run As’->’Ant Build…’. Deselect the ‘start’ item and select ‘create’. Then click ‘Run’. You should get the following message: ‘246 of 246 SQL statements executed successfully’ after some hard disc activity.
  3. Now run it as a Java-App: ‘Run As …’->Java Application and choose SpringReportViewerStarter as the main class.

Now, if you are finished, close the project and go on with

The Last Example

In this example you will again benefit from the ‘dependency injection’ pattern, because you will write a web GUI (via JSP) to query the database (-server).

Before building the war file you will have to set the properties spring.home and derby.home to an appropriated value. This was described in the previous example.
Now we can build the war file: Right click the build.xml file and choose ‘Run As’->’Ant Build’.

But how you can deploy a war file?Copy the war file to TOMCAT_HOME/webapps/. Go to the tomcat 5.5. folder where you decompressed it. Go deeper into the ‘bin’ folder and start tomcat:

JRE_HOME=/usr/java/latest && ./startup.sh
(In my case I had to change the default java home directory – thatwhy I added the JRE_HOME stuff.) Then go to: http://localhost:8080/ with your firefox browser 😉 and you will see the typical tomcat start page. If you seek for a better solution to handle deployment, this eclipse plugin could be useful for you. Another kind of deploying is to go to the ‘Tomcat Manager’ on the left of the side and then upload the war file. For this procedure you will need to set up a user with manager privileges. To do this go to the folder: conf/tomcat-users.xml and insert the following line, which ‘creates’ a user called ‘manager’ with manager privileges and mmaa123 as the password:

<user username=”manager” password=”mmaa123″ roles=”manager”/>

Now with the browser go to:

http://localhost:8080/report-engine/countries.view

And you will see the list of countries as html in your browser.

The author even implements the Swing GUI for this example, i.e. the report engine will be running on the top of tomcat and the data will be transferred through a spring library. For this you should run the project as Java Application and choose SpringReportViewerStarter. If you don’t believe it, you can shut down tomcat via ./shutdown.sh. Then you will get a RemoteConnectFailureException if you click on the ‘Refresh’ button within the Swing GUI, which indicates that the program really needs tomcat 😉

Conclusion

I hope I could show you how to get started with eclipse and furthermore the author of the ‘Spring in Small Doses’ could show you how to get started with Spring.

Finally I want to thanks Tiago Brito Spindola for his tutorial. For me his tutorial was very easy to follow, although I am an eclipse beginner.

Maybe other users know a better way of doing things in eclipse. Please let me know and feel free to leave your comments here.